
Introduction
The front-ends for the past few projects I’ve been on were written in Angular and AngularJs. I’ve been intrigued to try React for a quite some time now because of its popularity. The first time trying React was a struggle for me since the concept is different compared to Angular and AngularJs. The main differences are:
- React uses one-way binding while Angular and AngularJs use two-way binding.
- React is written in JSX.
When I tried implementing Mobx-React in the React app, I found that building the app becomes much easier. Mainly because of the @observable and @observer decorators and “store” concept introduced in Mobx. These allow me to write the code in a fashion similar to Angular and AngularJs.
To create the “store”, I tried using Mobx-State-Tree (MST). If you have tried Redux Store, the MST Store concept is similar. MST is not yet released (latest version at the time of this writing is 0.11.0), thus articles about MST are still sparse. In this article I write about how to use MST in a nutshell.
Prerequisites
To keep the article short, I don’t explain React, Mobx and Mobx-React implementation. It is recommended that you are familiar with those before reading the article.
Repository
The code used in this article can be found in GitHub repository. It is written in TSX. The code is based on a minimal setup app in another repository. Feel free to open an issue to ask / discuss anything or share some idea.
Basic Usage of MST in a Nutshell
Basically, in MST you create a model using types from the MST package.
import { types } from "mobx-state-tree";

// declaring MST model
const OurModel = types.model("OurModelName", {
    // our model properties
    id: types.number
})

// initializing MST model
const ourModel = OurModel.create({
    id: 1
});
We also use types to specify the type of the properties. These are some example of primitive types (a complete list of the types can be found in the docs):
- types.boolean; e.g. true, false
- types.number; e.g. 1, 2, 3
- types.string; e.g. “alice”, “bob”, “charlie”
In MST you will hear the term Snapshot. It is a JSON-formatted version of the MST model. To get the snapshot we can use getSnapshot method from the package.
import { getSnapshot } from "mobx-state-tree";

// ....

const ourModel = OurModel.create({
    id: 1
});

console.log(getSnapshot(ourModel));
// { id: 1 }
By default, the MST model doesn’t allow us to modify the model properties directly. It will throw an exception.
const ourModel = OurModel.create({
    id: 1
});

ourModel.id = 2; // an exception will be thrown on this statement
We need to use action to modify properties value.
// `types.model()` method is chainable
const OurModel = types.model("OurModelName", {
    id: types.number
}).actions((self) => ({
    changeId(newId: number): void {
        self.id = newId;
    }
}));

const ourModel = OurModel.create({
    id: 1
});

ourModel.changeId(2); // the id of ourModel is now changed to 2
The structure of MST is a tree. When we need a list of MST models, we put the list in another MST model as an array.
const OurModel = types.model("OurModelName", {
    id: types.number
}).actions((self) => ({
    changeId(newId: number): void {
        self.id = newId;
    }
}));

type IOurModel = typeof OurModel.Type;

const OurModelStore = types.model("OurModelStoreName", {
    models: types.array(OurModel)
});

type IOurModelStore = typeof OurModelStore.Type;

const ourModelStoreSnapshot = {
    models: [{
            id: 1
        } as IOurModel, {
            id: 2
        } as IOurModel
    ]
} as IOurModelStore;

// initialize OurModelStore from a snapshot
const ourModelStore = OurModelStore.create(ourModelStoreSnapshot);
Using MST in React App
Figure below shows how we usually handle the state in React.

In this example, Parent component has a state and methods which modify that state. When Child component B need to call any Parent component’s method, Parent component need to pass that method to Child component B through Child component A.
When we use MobX and MST, the state handling can be changed into figure below.
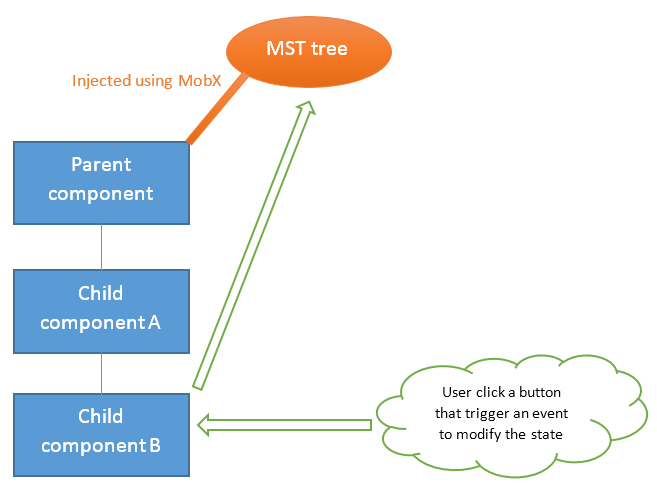
The state and methods which modify it is now handled by MST tree. The tree is injected using MobX to Parent component. Once injected, the tree is available for Parent component and its children. Now Parent component doesn’t need to pass any method to Child component B through Child component A. In fact, the React components now doesn’t need to handle any state at all. Child component B can directly call actions from the tree to modify the tree’s property.
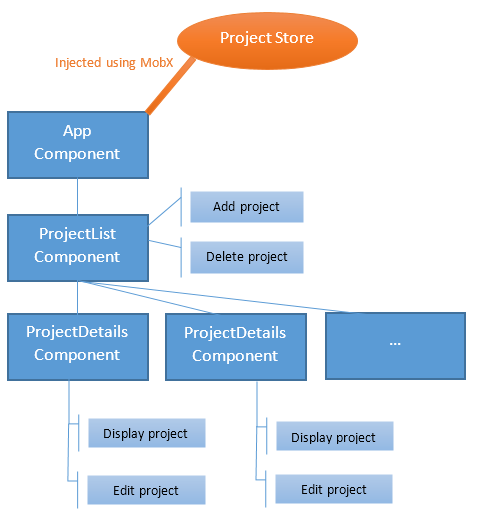
Code example
Let’s take the code in the repository for the example. The code is a simple CRUD app written in TSX. The features are add, update, delete, and read a project list. The code structure can be seen below.
Code below shows how we create the project store using MST.
export const Project = types.model("Project", {
    id: types.number,
    name: types.string,
    isActive: types.optional(types.boolean, false)
}).actions((self) => ({
    changeName(newName: string): void {
        if (!newName || newName.length == 0) {
            throw new Error("Project Model Action Error: new name should not be empty");
        }

        self.name = newName;
    },

    toggleActive(): void {
        self.isActive = !self.isActive;
    }
}));

export const ProjectStore = types.model("ProjectStore", {
    projects: types.array(Project)
}).actions((self) => ({
    addProject(newProject: IProject): void {
        if (!newProject.name || newProject.name.length == 0) {
            throw new Error("ProjectStore Model Action Error: new project name should not be empty");
        }

        let id = getUniqueProjectId(self.projects);
        self.projects.push({
            id: id,
            name: newProject.name,
            isActive: newProject.isActive
        } as IProject);
    },

    deleteProject(id: number): void {
        let index = self.projects.findIndex(project => project.id == id);
        if (index == -1) {
            throw new Error("ProjectStore Model Action Error: project not found");
        }

        self.projects.splice(index, 1);
    }
}));

export type IProject = typeof Project.Type;

export type IProjectStore = typeof ProjectStore.Type;

const projectStore = ProjectStore.create({
    projects: [{
        id: 1,
        name: "debugProject1",
        isActive: true
    } as IProject]
});

export default projectStore;
This is how we inject the project store in the App component. After injection the store will be available for the App component and all of its child components.
import { Provider } from "mobx-react";
import projectStore from "./store/project-store";

// use Provider to inject projectStore
const mainApp = (
    <Provider projectStore={projectStore}>
        <App></App>
    </Provider>
);

ReactDOM.render(
    mainApp,
    document.getElementById("app")
);
Currently only ProjectList component need the data from project store. Put @inject decorator in the component to use the project store. The store will be accessible from the component’s props. We also use @observer decorator to make the component automatically re-render its content when there is a change in the store.
import { observer, inject } from "mobx-react";

// ...

@inject("projectStore")
@observer
class ProjectList extends React.Component<IProjectListProps> {

    // ...

    render() {
        // the injected projectStore is available in the props of the component
        const { projectStore } = this.props;

        // ...
    }
}

// ...
After getting the store from the component’s props, we can read the store properties and call the store actions.
// ...

deleteProject(id: number): void {
    const { projectStore } = this.props;
    projectStore.deleteProject(id);
}

render() {
    const { projectStore } = this.props;
    return (
        <div>
            <ul>
                {projectStore.projects.map((project) =>
                    (<ProjectDetails key={project.id} project={project}
                    onDeletion={this.deleteProject}></ProjectDetails>))}
            </ul>
            {/* ... */}
        </div>
    );
}

// ...
Conclusion
An MST store is easy to understand and clear once we get used to the MST syntax. MST enables us to move all the state management from the React Components to the store. Thus, the components only handle the UI. This allows us to do isolated unit test on the store.
P.s. While trying MST, I wrote a few notes about problems I found and how to solve them.
Samuel is a developer at Palador. He is a Microsoft Certified Professional in Developing Azure Solutions.