
Create a Simple CRUD App Using ASP .NET Core and Angular 2 – Part 1
Arif Farwanto | April 13th, 2017
A modern web application is usually split into two parts, namely the frontend and backend, where each part has its own focus. For the backend, which typically handles requests from the frontend, common technology options include Node.js, Python, or the ASP .NET framework. For the frontend, where the focus is on interaction with the user, the most common frameworks today are Angular and React.
This tutorial is part one of the series on creating a CRUD application using Dapper for the data access layer, ASP.Net Core for the Rest API layer, Angular 2 for the front end, and SQL Server for the database. The IDE used was Visual Studio Community 2017.
Choosing a Data Access Layer Framework
For the data access layer, we chose Dapper, a lightweight/micro ORM framework over a more heavyweight ORM framework like Entity Framework. The main reason is performance and flexibility. With a micro ORM like Dapper, we have more control over the SQL executed by the database, as well as how the object graph is constructed. This allows us to fine tune the performance, unlike in Entity Framework. And since a micro ORM like Dapper doesn’t actually do the object (graph) mapping itself, we are given a lot of flexibility in this aspect.
Setting Up Our CRUD App
Creating the Rest API with ASP .NET Core is easy using the template in Visual Studio 2017.
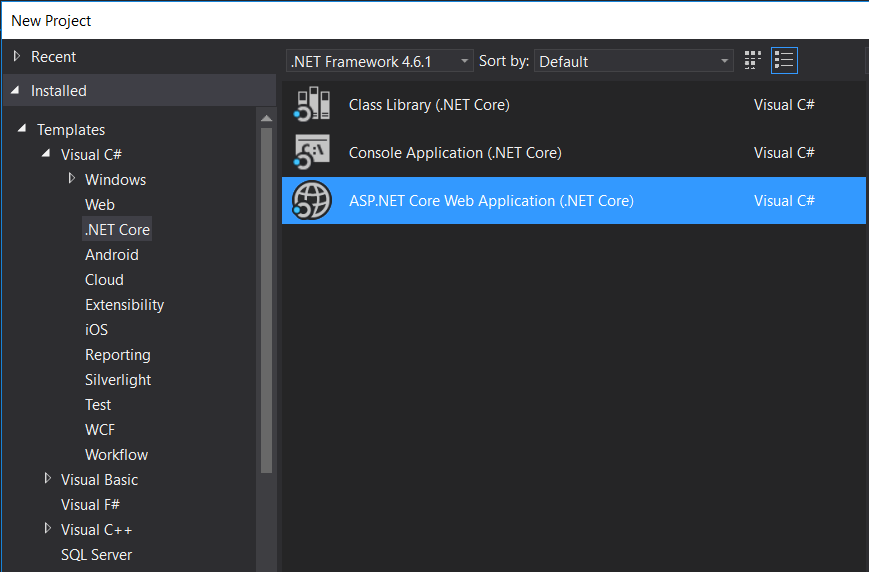
Figure 1. New project menu from VS 2017
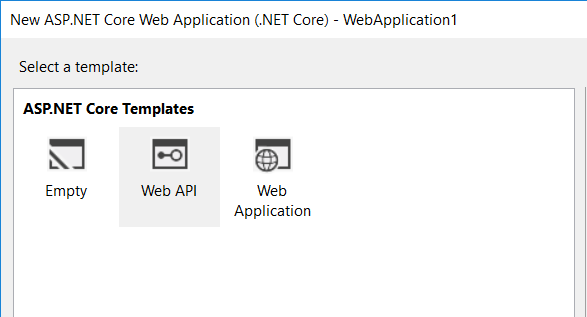
Figure 2. Select Web API template
Creating the Tables and Model Classes
In the Controller folder, a Controller class is generated with stubs for each of the Http verbs: HttpPost (Create), HttpGet (Read), HttpPut (Update), and HttpDelete (Delete).
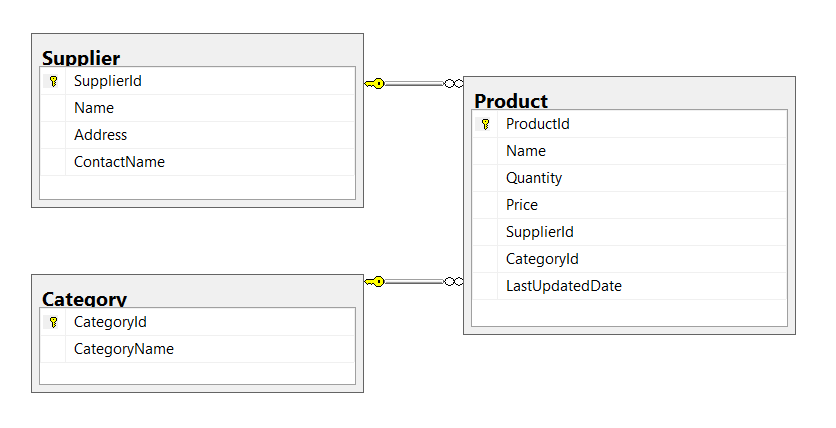
Figure 3. Database tables
Model class for product entity
namespace CRUDApp.Models
{
    public class Product
    {
        public int ProductId { get; set; }

        public string Name { get; set; }

        public int Quantity { get; set; }

        public decimal Price { get; set; }

        public int SupplierId { get; set; }

        public string SupplierName { get; set; }

        public int CategoryId { get; set; }

        public string CategoryName { get; set; }

        public System.DateTime LastUpdatedDate { get; set; }
    }
}
Creating the Data Access Layer
The Dapper package can be obtained through Nuget.

Figure 4. Dapper package in Nuget
After the library is installed, we can see that Dapper is a collection of function extensions of the SqlConnection class. Next, we can create a class that serves as a Data Access Layer, which will use the Dapper library. Here is an example of a Data Access Layer class.
ProductDataProvider class
namespace CRUDApp.DataProvider
{
    using System;
    using System.Collections.Generic;
    using System.Data.SqlClient;
    using System.Linq;
    using System.Threading.Tasks;
    using Models;
    using Dapper;
    using System.Data;

    public class ProductDataProvider : IProductDataProvider
    {
        private readonly string connectionString = "Server=localhost;Database=Tutorial;Trusted_Connection=True;";

        private SqlConnection sqlConnection;

        public async Task AddProduct(Product product)
        {
            using (var sqlConnection = new SqlConnection(connectionString))
            {
                await sqlConnection.OpenAsync();
                var dynamicParameters = new DynamicParameters();
                dynamicParameters.Add("@Name", product.Name);
                dynamicParameters.Add("@Price", product.Price);
                dynamicParameters.Add("@Quantity", product.Quantity);
                dynamicParameters.Add("@SupplierId", product.SupplierId);
                dynamicParameters.Add("@CategoryId", product.CategoryId);
                await sqlConnection.ExecuteAsync(
                    "AddProduct",
                    dynamicParameters,
                    commandType: CommandType.StoredProcedure);
            }
        }

        public async Task DeleteProduct(int id)
        {
            using (var sqlConnection = new SqlConnection(connectionString))
            {
                await sqlConnection.OpenAsync();
                var dynamicParameters = new DynamicParameters();
                dynamicParameters.Add("@id", id);
                await sqlConnection.ExecuteAsync(
                    "DeleteProduct",
                    dynamicParameters,
                    commandType: CommandType.StoredProcedure);
            }
        }

        public async Task GetProduct(int id)
        {
            using (var sqlConnection = new SqlConnection(connectionString))
            {
                await sqlConnection.OpenAsync();
                var dynamicParameters = new DynamicParameters();
                dynamicParameters.Add("@id", id);
                return await sqlConnection.QuerySingleOrDefaultAsync(
                    "GetProduct",
                    dynamicParameters,
                    commandType: CommandType.StoredProcedure);
            }
        }

        public async Task> GetProducts()
        {
            using (var sqlConnection = new SqlConnection(connectionString))
            {
                await sqlConnection.OpenAsync();
                return await sqlConnection.QueryAsync(
                    "GetProducts",
                    null,
                    commandType: CommandType.StoredProcedure);
            }
        }

        public async Task UpdateProduct(Product product)
        {
            using (var sqlConnection = new SqlConnection(connectionString))
            {
                await sqlConnection.OpenAsync();
                var dynamicParameters = new DynamicParameters();
                dynamicParameters.Add("@ProductId", product.ProductId);
                dynamicParameters.Add("@Name", product.Name);
                dynamicParameters.Add("@Price", product.Price);
                dynamicParameters.Add("@Quantity", product.Quantity);
                dynamicParameters.Add("@SupplierId", product.SupplierId);
                dynamicParameters.Add("@CategoryId", product.CategoryId);
                await sqlConnection.ExecuteAsync(
                    "UpdateProduct",
                    dynamicParameters,
                    commandType: CommandType.StoredProcedure);
            }
        }
    }
}
Dapper is built on top of the ADO .NET layer, which basically contains a set of extension methods to the SqlConnection class.
In the example above, the ProductDataProvider class has the GetProducts method that passes a stored procedure named “GetProducts” to Dapper. This stored procedure returns a set of rows. Dapper automatically executes this stored procedure, reads the result set, and constructs the Product objects.
Dapper’s ExecuteAsync method can be used to execute SQL that doesn’t return any result set.
Dapper’s QueryAsync method can be used to execute SQL that returns a result set. If the result set is expected to contain only one row, it is better to call the QueryAsyncFirstOrDefaultAsync method.
Lastly, we hooked up the functions in ProductDataProvider class with the corresponding stubs method in the ProductController class.
ProductController Class
namespace CRUDApp.Controllers
{
    using System;
    using System.Collections.Generic;
    using System.Linq;
    using System.Threading.Tasks;
    using Microsoft.AspNetCore.Mvc;
    using DataProvider;
    using Models;

    [Route("api/[controller]")]
    public class ProductController : Controller
    {
        private IProductDataProvider productDataProvider;

        public ProductController(IProductDataProvider productDataProvider)
        {
            this.productDataProvider = productDataProvider;
        }

        [HttpGet]
        public async Task> Get()
        {
            return await this.productDataProvider.GetProducts();
        }

        [HttpGet("{id}")]
        public async Task Get(int id)
        {
            return await this.productDataProvider.GetProduct(id);
        }

        [HttpPost]
        public async Task Post([FromBody]Product product)
        {
            await this.productDataProvider.AddProduct(product);
        }

        [HttpPut("{id}")]
        public async Task Put(int id, [FromBody]Product product)
        {
            await this.productDataProvider.UpdateProduct(product);
        }

        [HttpDelete("{id}")]
        public async Task Delete(int id)
        {
            await this.productDataProvider.DeleteProduct(id);
        }
    }
}
Testing the App
We can test one of the endpoints (HttpGet) and produce the results in Figure 5 below. To test the application, we can also use Http Client applications such as Postman and the like.

Figure 5. Result from get action in product resource.
We now have our simple CRUD app backend ready to go! In part two, we will discuss creating the frontend using Angular. The complete source can be viewed on GitHub.
Arif is a developer at Palador. He is a Microsoft Certified Professional in Implementing Microsoft Azure Infrastructure Solutions.