
Preamble
Welcome to my first web series! Our goal in this series is to create simple applications implementing Angular 2 and ReactJs. We want to discover both platform’s features and characteristics as much as possible. We will add new features to our applications in each part of the series. I will explain the process step-by-step and as simply as possible.
The first part of the series is, of course, setting an app up from scratch! Why build apps from scratch when a starter kit is already provided by the Angular 2 team and the ReactJs team? Because sometimes the starter kit includes dependencies which we won’t use. By creating apps from scratch, we will be able to know what the minimal dependencies needed are and what purpose they serve. In my opinion, it is easier and clearer to create the app from scratch rather than removing the unnecessary dependencies.
We will create two applications, the first one will be set up using Angular 2, while the latter will use ReactJs. We will use Visual Studio Code as our editor, npm as our package manager, webpack as our module bundler, and we will write the script in TypeScript.
Setting an App Up using Angular 2
Let’s start off by create an empty folder called “angular2-simpleexample” and open this folder using Visual Studio Code. Now that we have our empty workspace, what should we add first? I tend to create the package.json first so that we can include packages for our application. We can create this package.json file using “npm init” command or create the file manually. Either way the result will looks like this:
{
  "name": "angular2-simpleexample",
  "version": "1.0.0",
  "description": "Simple example of an app created using Angular2",
  "scripts": {
  },
  "keywords": [
    "angular2"
  ],
  "author": "",
  "license": "MIT",
  "dependencies": {
  },
  "devDependencies": {
  }
}
I think the important parts here are the “scripts”, “dependencies”, and “devDependencies”. “scripts” are used when we want to run our scripts at specific events, “dependencies” are the packages needed for our application, and “devDependencies” are packages needed in the development of our application.
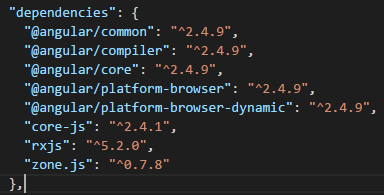
In order to work with the Angular 2 platform, we need to include the mandatory packages. We need to include all of them because they have a peer dependency relationship with each other. They are:
Next, we need to setup our development packages. Here is the minimum requirement for our needs:
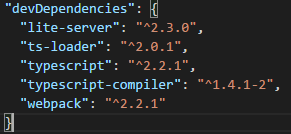
Type “npm install” in the terminal to install these packages.
As we use webpack for our modules which are written in TypeScript. We need the ts-loader to load those TypeScript files. Using webpack requires us to create its configuration file called webpack.config.js. The minimum configuration looks like this:
module.exports = {
    entry: "./src/main.ts",

    output: {
        filename: "bundle.js",
        path: __dirname + "/src",
    },

    resolve: {
        extensions: ['.js', '.ts']
    },

    module: {
        loaders: [
          {
              test: /\.ts?$/,
              exclude: /node_modules/,
              loaders: ["ts-loader"]
          }
        ]
    }
};
The entry property is the location of our main application file and the output is what the bundled file called and where it is located. Because we only use TypeScript and JavaScript on our application, we put “.js” and “.ts” in the resolve property. The module.loaders property tells the webpack to use ts-loader to load our TypeScript files excluding the node_modules folder.
We use lite-server to serve our web application. It needs a configuration file called bs-config.json. Here is the minimal configuration for our server:
{
  "server": {
    "baseDir": "src",
    "routes": {
      "/node_modules": "node_modules"
    }
  }
}
Notice the baseDir in the bs-config.json. It is the folder where our application will be located.
Now that we have our packages included, let’s create scripts to compile our TypeScript files and serve our web application upon typing “npm start” command:

The “build” command will compile our TypeScript files in the “src/” folder, and then bundle them with webpack into bundle.js located in the “src” folder. A TypeScript configuration file called tsconfig.json is needed to compile our files. Because the compilation happens in the “src/” folder, we put tsconfig.json in that folder. Here is the minimum setting for the tsconfig.json:
{
  "compilerOptions": {
    "noImplicitAny": false,
    "noEmitOnError": true,
    "removeComments": false,
    "experimentalDecorators": true,
    "sourceMap": true,
    "target": "es5",
    "lib": ["es6", "dom"]
  },
  "exclude": [
    "../node_modules"
  ]
}
At this point the package preparation is done! Let’s continue with our application script. We need a component to display the UI, a module to include all dependencies needed in the app (including our component), and a main.ts file to bootstrap our module. Below is the code for these files:
src/app/app.component.ts
import { Component } from "@angular/core";

@Component({
  selector: "app",
  template: `<h1>Hello World!</h1>`
})

export class AppComponent { }
src/app/app.module.ts
import { NgModule }      from "@angular/core";
import { BrowserModule } from "@angular/platform-browser";
import { AppComponent }  from "./app.component";

@NgModule({
  imports: [ BrowserModule ],
  declarations: [
    AppComponent
  ],
  bootstrap: [
    AppComponent
  ]
})

export class AppModule { }
src/main.ts
import { Component } from "@angular/core";

@Component({
  selector: "app",
  template: `<h1>Hello World!</h1>`
})

export class AppComponent { }
Now that we have our component registered in the app, let’s create “src/index.html” file and call it:
<script src="node_modules/core-js/client/shim.min.js"></script>
<script src="node_modules/zone.js/dist/zone.js"></script>

<app>Loading Angular App...</app>

<script src="bundle.js"></script>
Since we use webpack to bundle our code, we only need to include “bundle.js” in the index.html. We are finally done! Type “npm start” in the terminal to start the application! The code is available here.
Setting an App Up using ReactJs
The steps in preparing ReactJs here are similar to that of Angular 2. First we create an empty folder called “reactjs-simpleexample”. Since we will also use lite-server, webpack, and TypeScript, we need those webpack.config.js, bs-config.json, and tsconfig.json files in the same directory structure. While bs-config.json has the same code as in Angular 2, there are slight differences in webpack.config.js and tsconfig.json. Here is the webpack.config.js code:
module.exports = {
    entry: "./src/app/app.tsx",

    output: {
        filename: "bundle.js",
        path: __dirname + "/src",
    },

    resolve: {
        extensions: ['.js', '.tsx']
    },

    module: {
        loaders: [
          {
              test: /\.tsx?$/,
              exclude: /node_modules/,
              loaders: ["ts-loader"]
          }
        ]
    }
};
Instead of using the “.ts” extension, we use the “.tsx” extension here. This is because we use JSX files which use an embeddable XML-like syntax and can be transformed into a valid JavaScript. This makes code writing in ReactJs easier.
Here is the code for tsconfig.json:
{
  "compilerOptions": {
    "noImplicitAny": false,
    "noEmitOnError": true,
    "removeComments": false,
    "sourceMap": true,
    "jsx": "react",
    "target": "es5"
  },
  "exclude": [
    "../node_modules"
  ]
}
Because we use JSX files, we need to tell TypeScript to use the “react” mode to create the output.
The package.json has different “script”, “dependencies”, and “devDependencies”:
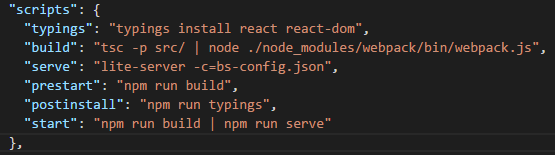
In case you have a react module import problem like I do, you should add the “typings” script to use the typings reference.
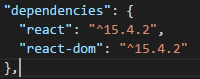
We only need these two dependencies to create the same application as we did in Angular 2.
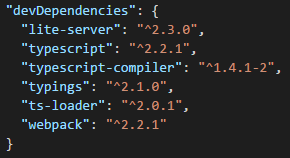
Because we use “typings” in our script we need to include the package in the “devDependencies”.
We are done with the preparation. Type “npm install” in the terminal to install these packages. The next step is to create our application scripts. Create “src/app/app.tsx” and copy this code:
/// <reference path="../../typings/modules/react/index.d.ts" />
/// <reference path="../../typings/modules/react-dom/index.d.ts" />

import * as React from "react";
import * as ReactDOM from "react-dom";

ReactDOM.render(
    <h1>Hello World!</h1>,
    document.getElementById("app")
);
Finally let’s create the “src/index.html” file and we are done!
<div id="app"></div>
<script src="bundle.js"></script>
Type “npm start” in the terminal to run this application. The full code can be seen here.
Conclusion
The result of both applications should look like this:
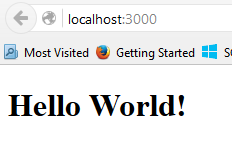
As you can see, setting up an app using ReactJs from scratch is simpler than using Angular 2. But how about the performance comparison between these two? We will see in part 2, so stay tuned!
Samuel is a developer at Palador. He is a Microsoft Certified Professional in Developing Azure Solutions.