
For one of our projects, Time Tracker, we use Angular 2 as the front end platform. It is a web application that includes charts referencing a dynamic dataset. In this post I will show you how to create a pie chart with a dynamic dataset.
These are the steps needed to achieve our goal:
- Setting up the Angular 2
- Creating the pie chart component
- Including the required library
- Creating a pie chart using a sample dataset
- Setting up the data and injecting it into the pie chart component
- Preparing our dynamic dataset
- Creating a pie chart using a dynamic dataset
Setting up the Angular 2
For a quick setup, the angular team has already created a quickstart seed on github. We only need to install the npm packages and we are ready to create the pie chart component!
Creating the Pie Chart Component
Including the Required Library
In order to create the pie chart, we need to include d3.js library. We will use version 3.5.5. You can include this version of D3 by typing it in the “package.json” as shown in figure 1.
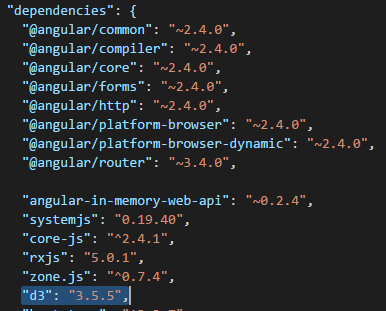
Figure 1. Including d3.js in package.json.
Creating a pie chart using a sample dataset
Now we need to create a component for displaying the pie chart. Let’s create a component called “pie-chart.component.ts” and the template called “pie-chart.html” in the “app” folder. To start, we will use a sample dataset. Later we will use dynamic data which we can add on runtime. This code will generate the pie chart as an SVG, which is nice because SVGs scale well on any screen size and can be styled with CSS.
Copy this code to “pie-chart.component.ts”:
import { Component, ElementRef, ViewChild, AfterViewInit } from "@angular/core";
import * as D3 from "d3";

@Component({
    selector: "pie-chart",
    templateUrl: "/app/pie-chart.html"
})

export class PieChartComponent implements AfterViewInit {
    @ViewChild("containerPieChart") element: ElementRef;

    private host: D3.Selection;
    private svg: D3.Selection;
    private width: number;
    private height: number;
    private radius: number;
    private htmlElement: HTMLElement;
    private pieData = [1, 2, 3, 4, 5]

    ngAfterViewInit() {
        this.htmlElement = this.element.nativeElement;
        this.host = D3.select(this.htmlElement);
        this.setup();
        this.buildSVG();
        this.buildPie();
    }

    private setup(): void {
        this.width = 250;
        this.height = 250;
        this.radius = Math.min(this.width, this.height) / 2;
    }

    private buildSVG(): void {
        this.host.html("");
        this.svg = this.host.append("svg")
            .attr("viewBox", `0 0 ${this.width} ${this.height}`)
            .append("g")
            .attr("transform", `translate(${this.width / 2},${this.height / 2})`);
    }

    private buildPie(): void {
        let pie = D3.layout.pie();
        let arcSelection = this.svg.selectAll(".arc")
            .data(pie(this.pieData))
            .enter()
            .append("g")
            .attr("class", "arc");

        this.populatePie(arcSelection);
    }

    private populatePie(arcSelection: D3.Selection<D3.layout.pie.Arc>): void {
        let innerRadius = this.radius - 50;
        let outerRadius = this.radius - 10;
        let pieColor = D3.scale.category20c();
        let arc = D3.svg.arc<D3.layout.pie.Arc>()
            .outerRadius(outerRadius);
        arcSelection.append("path")
            .attr("d", arc)
            .attr("fill", (datum, index) => {
                return pieColor(`${index}`);
            });

        arcSelection.append("text")
            .attr("transform", (datum: any) => {
                datum.innerRadius = 0;
                datum.outerRadius = outerRadius;
                return "translate(" + arc.centroid(datum) + ")";
            })
            .text((datum, index) => this.pieData[index])
            .style("text-anchor", "middle");
    }
}
Copy this code to “pie-chart.html”:
<div #containerPieChart></div>
We have created the pie chart component and html, but we haven’t registered this component in our module. So let’s register our component by importing the component class name in “app.module.ts” (figure 2) and type the name in the “declarations” property of @NgModule (figure 3).
Figure 2. Import pie-chart.component in app.module.ts.
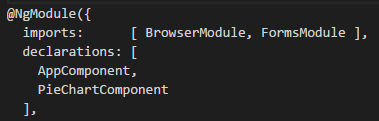
Figure 3. Registering our PieChartComponent in the module.
The only thing left to do is to call this pie chart component from “app.html”. Copy this code into “app.html” and our simple pie chart is finished. Figure 4 shows our pie chart after we start our application.
<div style="width:400px; height:400px;">
<pie-chart></pie-chart>
</div>
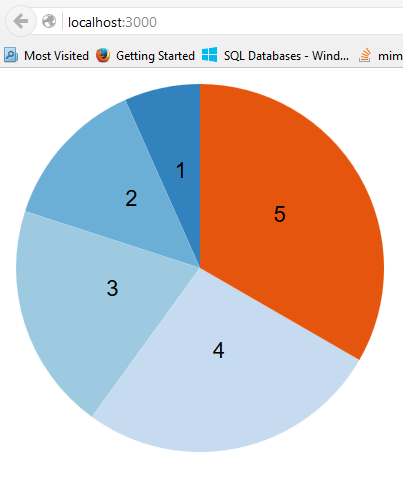
Figure 4. Our pie chart with a sample dataset.
Setting Up the Data and Injecting It Into the Pie Chart Component
Preparing Our Dynamic Dataset
Now that we have our pie chart set up, let’s prepare our dynamic dataset (we can alter the dataset on runtime). First we need to create the data interface, and then create the data service to provide the data to our application. Create a file called “data.interface.ts” in the “app” folder and copy this code to create the interface:
export interface IData {
label: string,
value: number
}
Create a file called “data.service.ts” and copy this code to create our data service. Then we register it to our module as shown in figure 5.
import { Injectable } from "@angular/core";
import { BehaviorSubject } from "rxjs/BehaviorSubject";
import { IData } from './data.interface';

@Injectable()
export class DataService {
    private mockData: IData[] = [
        {
            label: "data1",
            value: 1,
        },
        {
            label: "data2",
            value: 2,
        },
		{
			label: "data3",
			value: 3,
		},
		{
			label: "data4",
			value: 4,
		}
    ];

    private dataSubject = new BehaviorSubject<IData[]>(this.mockData);

    $data = this.dataSubject.asObservable();

    addData(newData: IData) {
        this.mockData.push(newData);
        this.dataSubject.next(this.mockData);
    }
}
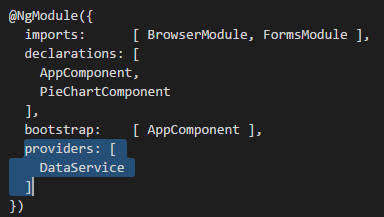
Figure 5. Registering DataService in our module.
We use BehaviorSubject for our data because it always returns a value on subscription, which suits our needs.
Creating a Pie Chart using a Dynamic Dataset
Now that we have prepared our dynamic dataset, it’s time to inject it into our application. First we need to inject our data service into the app component to let us alter the data on runtime.
Copy this code into “app.component.ts”:
import { Component, OnInit } from '@angular/core';
import { IData } from './data.interface';
import { DataService } from './data.service';

@Component({
	selector: 'my-app',
	templateUrl: '/app/app.html'
})
export class AppComponent {
	data: IData[];
	newLabel: string;
	newValue: number;

	constructor(private dataService: DataService) { }

	ngOnInit() {
		this.dataService.$data.subscribe(data => {
			this.data = data;
		});
	}

	addData(): void {
		let newData = {
			label: this.newLabel,
			value: this.newValue
		} as IData;

		this.dataService.addData(newData);
	}
}
and this code into “app.html” (we are using Bootstrap classes to style our form layout):
<h1>Pie Chart with dynamic data</h1>
<div class="row">
    <div class="col-md-2">
        <div class="form-group">
            <label for="dataLabel">Label : </label>
            <input class="form-control" type="text" name="dataLabel" [(ngModel)]="newLabel" />
        </div>
        <div class="form-group">
            <label for="dataValue">Value : </label>
            <input class="form-control" type="number" name="dataValue" [(ngModel)]="newValue" />
        </div>
        <button (click)="addData()" class="btn btn-primary">Add data</button>
    </div>
</div>
<div class="row">
    <div class="col-md-5" style="width:400px; height:400px;">
        <pie-chart></pie-chart>
    </div>
    <div class="col-md-7">
        <table class="table table-striped">
            <thead>
                <tr>
                    <td>Label</td>
                    <td>Value</td>
                </tr>
            </thead>
            <tbody>
                <tr *ngFor="let d of data">
                    <td [innerHTML]="d.label"></td>
                    <td [innerHTML]="d.value"></td>
                </tr>
            </tbody>
        </table>
    </div>
</div>
Finally, we inject our data service into our pie chart component to provide the dynamic data for the chart.
Copy this code into “pie-chart.component.ts”:
import { Component, ElementRef, ViewChild, AfterViewInit } from "@angular/core";
import { IData } from './data.interface';
import { DataService } from './data.service';
import * as D3 from "d3";

@Component({
    selector: "pie-chart",
    templateUrl: "/app/pie-chart.html"
})

export class PieChartComponent implements AfterViewInit {
    @ViewChild("containerPieChart") element: ElementRef;

    private host: D3.Selection;
    private svg: D3.Selection;
    private width: number;
    private height: number;
    private radius: number;
    private htmlElement: HTMLElement;
    private pieData: IData[];

    constructor(private dataService: DataService) { }

    ngAfterViewInit() {
        this.htmlElement = this.element.nativeElement;
        this.host = D3.select(this.htmlElement);
        this.dataService.$data.subscribe(data => {
            this.pieData = data;
            this.setup();
            this.buildSVG();
            this.buildPie();
        });
    }

    private setup(): void {
        this.width = 250;
        this.height = 250;
        this.radius = Math.min(this.width, this.height) / 2;
    }

    private buildSVG(): void {
        this.host.html("");
        this.svg = this.host.append("svg")
            .attr("viewBox", `0 0 ${this.width} ${this.height}`)
            .append("g")
            .attr("transform", `translate(${this.width / 2},${this.height / 2})`);
    }

    private buildPie(): void {
        let pie = D3.layout.pie();
        let values = this.pieData.map(data => data.value);
        let arcSelection = this.svg.selectAll(".arc")
            .data(pie(values))
            .enter()
            .append("g")
            .attr("class", "arc");

        this.populatePie(arcSelection);
    }

    private populatePie(arcSelection: D3.Selection<D3.layout.pie.Arc>): void {
        let innerRadius = this.radius - 50;
        let outerRadius = this.radius - 10;
        let pieColor = D3.scale.category20c();
        let arc = D3.svg.arc<D3.layout.pie.Arc>()
            .outerRadius(outerRadius);
        arcSelection.append("path")
            .attr("d", arc)
            .attr("fill", (datum, index) => {
                return pieColor(this.pieData[index].label);
            });

        arcSelection.append("text")
            .attr("transform", (datum: any) => {
                datum.innerRadius = 0;
                datum.outerRadius = outerRadius;
                return "translate(" + arc.centroid(datum) + ")";
            })
            .text((datum, index) => this.pieData[index].label)
            .style("text-anchor", "middle");
    }
}
Figure 6 shows how our pie chart application looks now.
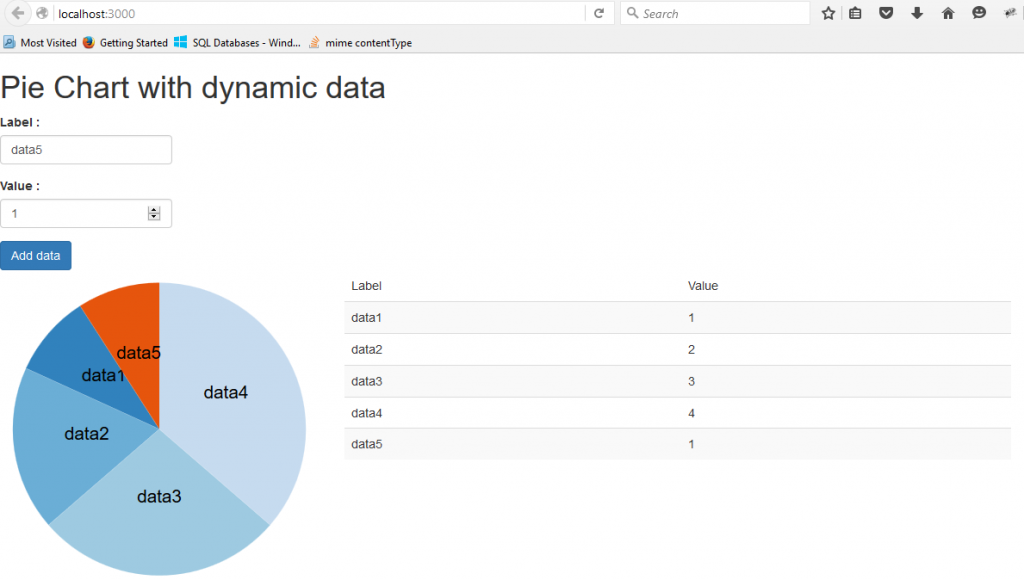
Figure 6. Our application user interface.
Conclusion
By using d3.js library and angular 2, we are able to create an SVG chart with a dynamic dataset. You can download the app here on GitHub, or you can see a live demo of the app on this Plunker.
Samuel is a developer at Palador. He is a Microsoft Certified Professional in Developing Azure Solutions.